Rapid Tooling
Rapid Tooling: Lower Cost, Faster Time
Author: Luke Lao
Preface:
In this rapidly changing era, with the advancement of science and technology, it is not only reflected in the faster pace of people’s lives, but also in the changes in the manufacturing industry. The emergence of rapid molds is in response to the changes of this era.
Rapid tooling primarily serves the product development and manufacturing processes in two main ways: 1) prototyping to test the functionality or feasibility of the product and its manufacturing processes, and 2) enabling small-batch production.
- Prototype tooling: Prototyping helps us evaluate the product’s appearance, functionality, and other aspects.[1] There are various industrial rapid prototyping processes, such as 3D printing, CNC machining, and more. These methods are quick and cost-effective, but they also have their limitations. For example, the materials used in 3D printing may differ from the design and actual production. Curved surfaces can be challenging to produce with CNC machining, and the design of plastic parts for injection molding differs from parts designed for CNC production. Rapid tooling, which is essentially a low-volume injection molding process, can overcome these challenges. It allows testing the impact of different materials on the product. Also, since it involves injection molding, there’s no need to alter part designs due to CNC machining characteristics. Additionally, it enables testing potential issues during the injection molding process.
- Small-Batch Production: Some products may not require a high total production volume. A significant portion of the high cost of traditional molds is to ensure a longer mold lifespan. Rapid tooling allows for small-batch production with less expensive mold costs, and the leading time of mold making is a shorter, faster time to market. Another scenario is when a product needs small-batch production for market testing after prototyping to assess market acceptance or identify potential errors before large-scale production. This is also called bridge production. In such cases, when the total production volume is uncertain, using rapid tooling is a more cost-effective approach.
3D printing rapid prototyping
Rapid tooling
Rapid tooling process: how is it cheaper and faster?
Let us first have a look at the production tooling process, then compare it with the process[2] of rapid tooling. Then we will find the secret why it is cheaper and faster.
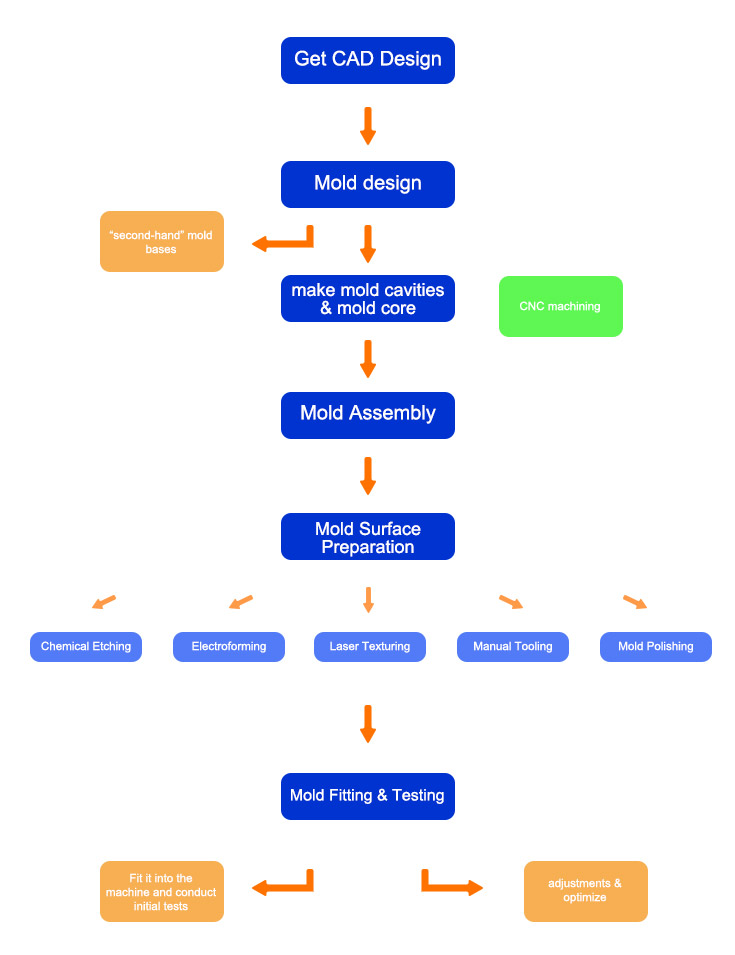
The production tooling process
Mold design
Once the mold manufacturer gets the CAD design of the product, a mold design is then made. According to the mold design a standard mold base, mold core mold cavity material, and other accessories (eject pins, springs, etc) are then ordered. It normally takes about a week to get all the material ready.
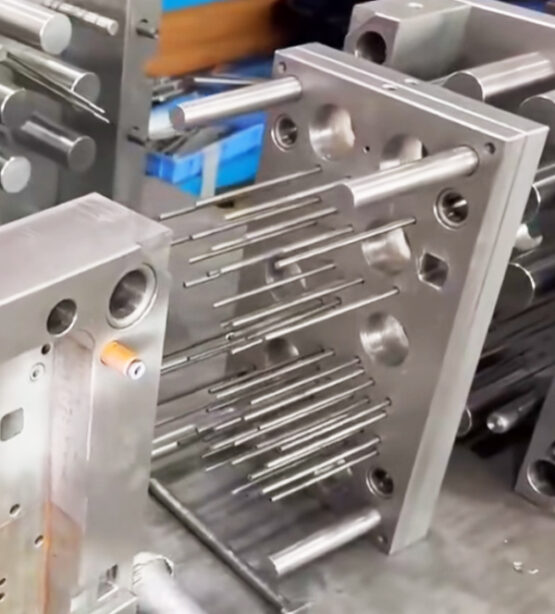
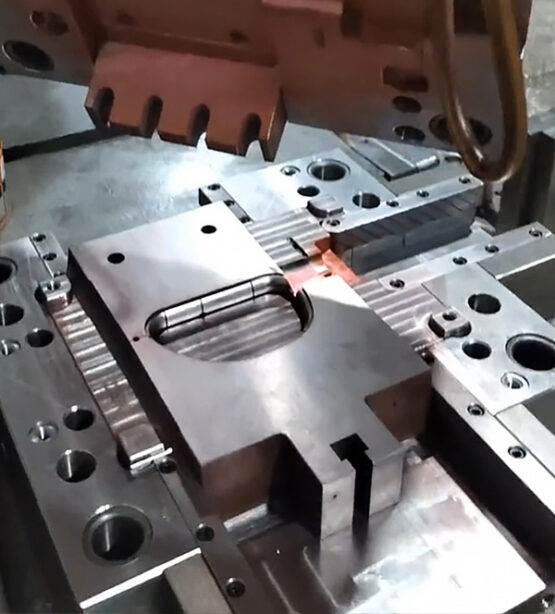
Mold cavity and mold core
The next step is to make mold cavities and mold core. Depending on the actual product design and mold core material hardness, either CNC machining or EDM process are applied. Other mold structures like cooling channels are also made in this step.
Heat Treatment
Apply heat treatment to enhance the hardness and strength of the mold components, improving their durability and wear resistance.
Mold Assembly
a. Assemble the mold components, ensuring they fit together precisely and securely. b. Incorporate necessary components like guide pins, ejector pins, and screws for proper functionality.
Mold Surface Preparation
Apply the chosen texture to the mold surface using various techniques:
Chemical Etching: Use chemicals to etch the texture onto the mold surface. [3]This method can achieve fine details and complex patterns.
Electroforming: Deposit a layer of texture by electroplating a metal onto the mold surface, creating the desired texture pattern. [4]
Laser Texturing: Utilize lasers to etch the desired texture directly onto the mold surface, providing precision and flexibility in texture design.
Manual Tooling: Craftsmen may use manual tools to carve the texture into the mold surface for more intricate designs.
Mold Polishing: After applying the texture, carefully polish the mold surface to remove any rough edges or imperfections, ensuring a smooth and uniform texture.
Surface Treatment (Optional)
Apply additional surface treatments like coatings or finishes to enhance the durability and longevity of the textured mold.
Mold Fitting and Testing
a. Fit the mold into the injection molding machine and conduct initial tests to ensure proper alignment and functionality.
b. Make necessary adjustments to optimize the mold’s performance, such as adjusting the cooling system and ensuring proper ejection of molded parts.
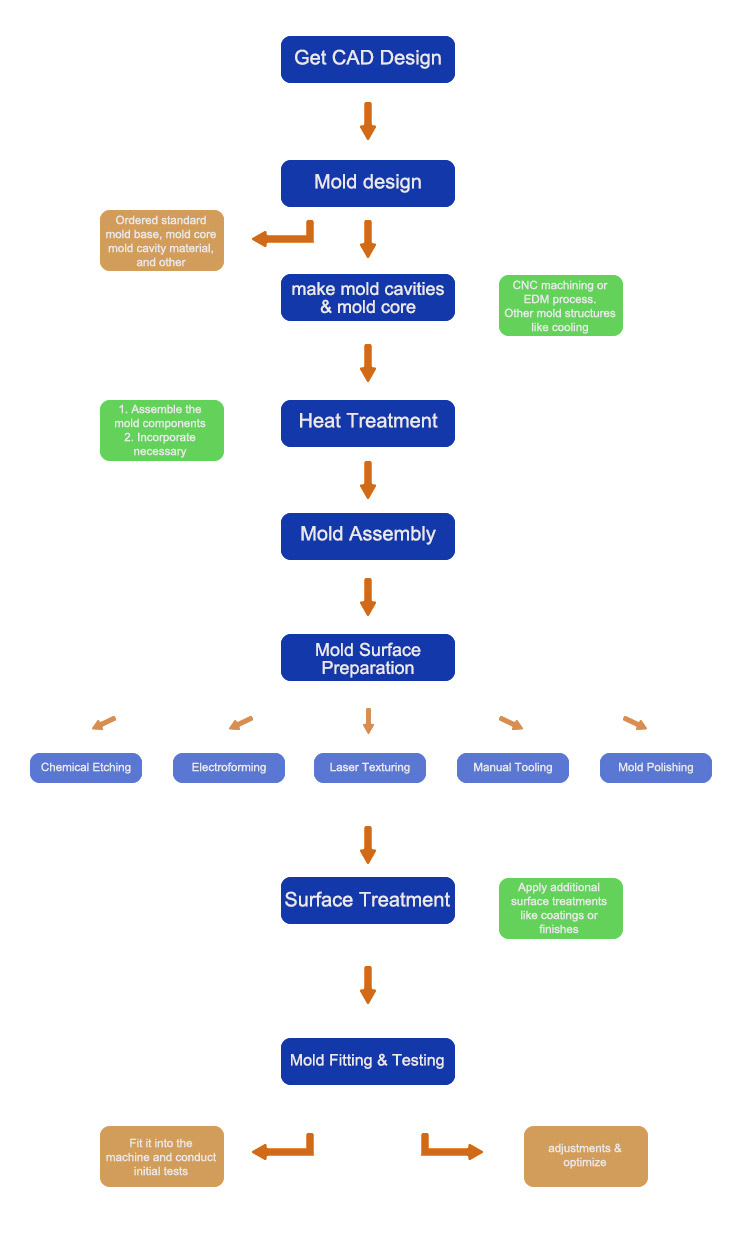
Production tooling process
The rapid tooling process
The production process of rapid tooling differs from production tooling in several important ways. One key distinction is related to the use of molds:
1. Mold Base Usage:
In rapid tooling, existing or recycled mold bases, often referred to as “second-hand” mold bases, are commonly utilized. These mold bases may have been used in previous molds and are repurposed for the new tool.
The advantage of using recycled mold bases lies in their cost-effectiveness, as they are typically less expensive than newly ordered mold bases.
Additionally, using recycled mold bases can save time during the tooling process because certain structural elements on the mold base may already be pre-existing and do not require additional machining time.
This approach of using recycled mold bases is one of the primary ways rapid tooling differs from the more traditional approach of production tooling.
2. Material Selection for Mold Core and Mold Cavity:
In production tooling, the mold core and mold cavity materials are typically chosen to withstand the wear and corrosion associated with high-volume production (typically around 300,000 injection cycles). These molds often use hardened or relatively hard mold steels.
On the other hand, rapid tooling adapts its material selection based on the required tool lifespan, often opting for softer materials such as non-hardened steel or aluminum.
Using softer materials in rapid tooling presents two advantages:
Firstly, softer materials are more cost-effective compared to hardened mold steels.
Secondly, soft materials are easier to machine, resulting in time savings during the subsequent processing and forming stages.
This difference in material selection for mold core and cavity is another significant distinction between rapid tooling and traditional production tooling.
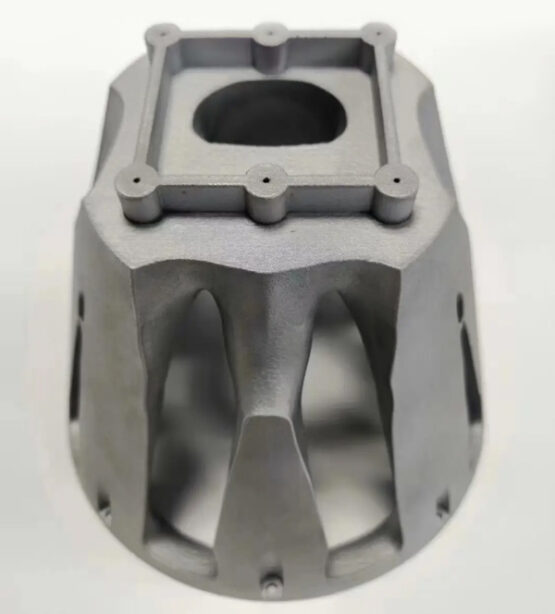
aluminum rapid tooling
non-hardened steel rapid tooling
3. Processing Techniques for Mold Cavity and Mold Core:
In production tooling, the use of relatively hard materials for mold cavities and mold cores can make CNC machining challenging at times. As a result, Electrical Discharge Machining (EDM) is often preferred. EDM involves the use of electrical discharges to shape the material. It is particularly useful for intricate or complex features.
On the other hand, rapid tooling employs softer materials, making them more suitable for CNC machining. EDM is typically reserved for features like sharp internal corners or complex surfaces that are difficult to machine using CNC. EDM involves creating an electrode using CNC and then using this electrode for the electrical discharge process, gradually shaping the cavity in increments as small as 10 micrometers. This makes EDM a more time-consuming process compared to CNC machining.
Generally, features that can be machined in a few hours with CNC may take several days when using EDM.
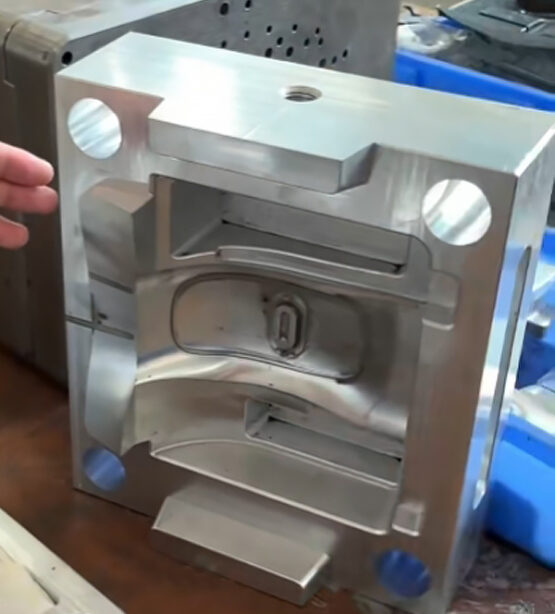
4. Mold Design:
When designing the mold, considerations are made based on whether the intended production is for large-scale or small-scale manufacturing. Different structures and features are chosen to optimize cost and efficiency for each scenario.
For instance, in designing molds for high-volume production, features like lifters or slides are often incorporated, which are efficient for mass production. These features aid in processes such as undercut injection molding.
On the other hand, for molds intended for low-volume production, cost-effectiveness is a priority. Therefore, simpler and more affordable solutions, such as manual inserts, are favored over complex mechanisms like slides or lifters. These manual inserts can be more economically viable for smaller production runs.
The basic design philosophy of rapid tooling is to trade off an increase in injection molding cycle time for a reduction in mold production time and cost.
Due to the differences outlined between rapid tooling and production tooling processes, the cost of rapid tooling can be reduced to approximately half of that of production tooling, and the production cycle is typically only about one-third of the time required for production tooling.
rapid tooling process
Rapid tooling & Production tooling Difference
| Rapid Tooling | Conventional Tooling | |
|---|---|---|
| Speed | 7~15 days |
4~8 weeks |
| Tooling cost | low overhead costs | considerable overhead costs. |
| Ideal production volume | 1000 ~ 30,000 parts, depending on the process and tooling material | ~30k + parts, varies by production process |
| Applications | Product validation testing Bridge tooling Short run, on-demand, or custom production |
Mass production |
Rapid tooling vs rapid prototyping
Rapid prototyping is when we quickly create the actual product to test and see how it looks and works. It helps us improve the design and understand the product better.
Rapid tooling is about making molds or tools quickly, which are needed to mass-produce the product. These molds are like templates that shape the product in large quantities. It’s a fast and cost-effective way to make many products once the design is finalized.
In simple terms, rapid prototyping is about the actual product, and rapid tooling is about quickly making the tools to make many of those products.
Rapid prototyping involves processes such as 3D printing, vacuum casting, and CNC machining. On the other hand, rapid tooling is akin to the production tooling process, but it’s quicker and more cost-effective.
Advantages and Disadvantages of Rapid Tooling
Rapid tooling, as a method for swiftly producing molds or tools needed for prototyping or bridge production, offers several advantages and has a few drawbacks to consider[5].
Advantages:
Speed and Efficiency: Rapid tooling significantly reduces the time required to create molds compared to traditional tooling methods. This leads to quicker product development and faster time-to-market.
Cost-Effectiveness: Despite the initial setup costs, rapid tooling is cost-effective in the long run, especially for large production quantities. It minimizes overall production costs by accelerating the manufacturing process.
Design Flexibility: It allows for design modifications and improvements even after the tooling process has started, enhancing design flexibility and adaptability to changing requirements.
Material Selection: Rapid tooling enables the use of a wide range of materials, including production-grade materials, offering a more accurate representation of the final product’s properties.
Customization and Prototyping: Rapid tooling allows for the customization and prototyping of molds for specific products, accommodating diverse product designs and requirements.
Disadvantages:
Limited Tool Life: Compared to traditional tooling, molds produced through rapid tooling may have a shorter lifespan due to the use of softer materials, impacting long-term production.
Material Constraints: The choice of mold materials in rapid tooling is limited compared to traditional tooling, potentially affecting the tool’s robustness and durability.
Complexity and Features: Highly complex mold designs and intricate features may pose challenges in rapid tooling, requiring additional time and effort.
Tolerance and Precision: Achieving extremely tight tolerances and high precision, often essential for certain industries, can be more challenging with rapid tooling compared to traditional tooling.
Volume Limitations: Rapid tooling may not be cost-effective or efficient for very high production volumes compared to traditional production tooling methods.
Can Mold Cores and Cavities be Created using Metal 3D Printing?
Metal 3D printing, also known as additive manufacturing, has evolved to a point where it is indeed feasible to create mold cores and cavities using this innovative technology. The process involves building three-dimensional metal parts layer by layer, allowing for intricate and complex geometries that would be challenging with traditional manufacturing methods.
Advantages of Metal 3D Printing for Mold Cores and Cavities:
Complex Geometries: Metal 3D printing enables the fabrication of molds with intricate internal features and complex geometries, which can be crucial for creating specialized or unique products.
Rapid Prototyping and Iteration: 3D printing allows for the rapid prototyping of molds, facilitating faster design iterations, adjustments, and improvements based on testing and evaluation.
Tailored Design: The technology allows for the customization and tailoring of mold designs to specific product requirements, providing a high level of design freedom and adaptability.
Reduced Material Waste: Additive manufacturing is an efficient process that minimizes material waste compared to traditional subtractive manufacturing methods, contributing to cost-effectiveness and sustainability.
Considerations and Limitations:
Surface Finish: Post-processing steps like machining or polishing may be needed to achieve the desired surface finish for mold cavities and cores, as the surface quality from 3D printing may not always meet the required specifications.
Material Properties: The material properties of 3D printed metals may vary from those of conventionally manufactured metals. Understanding these differences and their impact on mold performance is essential.
Cost: Metal 3D printing can be more expensive compared to traditional mold manufacturing techniques, especially for larger molds or when considering material and equipment costs.
Size Constraints: The size of molds that can be created using 3D printing is limited by the available printing equipment and technology, potentially restricting the scale of production.
In conclusion, we’ve explored how rapid tooling is a cost-effective and speedy way to make tools for manufacturing. It’s crucial in today’s fast-paced market.
References:
- [1] A Case Study of How Interface Sketches, Scenarios and Computer Prototypes Structure Stakeholder Meetings Site exit disclaimer by Johanson and Arvola
- [2] Mendible G.A., Rulander J.A., Johnston S.P. Comparative study of rapid and conventional tooling for plastics injection molding. Rapid Prototyp. J. 2017;23:344–352. doi: 10.1108/RPJ-01-2016-0013.
- [3] Bagehorn, S., Mertens, T., Greitemeier, D., Carton, L., Schoberth, A., 2015, “Surface finishing of additive manufactured TI-6A1–4V-a comparison of electrochemical and mechanical treatments,” 6th European Conference for Aerospace Sciences. Krakow, Poland, paper #99.
- [4] K.P. Rajurkar et al. New developments in electro-chemical machining Annals of the CIRP (1999)
- [5] Guide to Rapid Tooling www.formlabs.com
Rapid Tooling: Lower Cost, Faster Time to Market by Luke Lao is licensed under CC BY-NC 4.0![]()
![]()
![]()